1. Flux 是什么
An application architecture for React utilizing a unidirectional data flow.
Flux 是利用单向数据流的形式来组合 React 组件的应用架构思想。它不是一个实现好的框架,目前有很多基于 Flux 的三方实现,本文采用的是 Facebook 的官方实现。
2. Flux 数据流
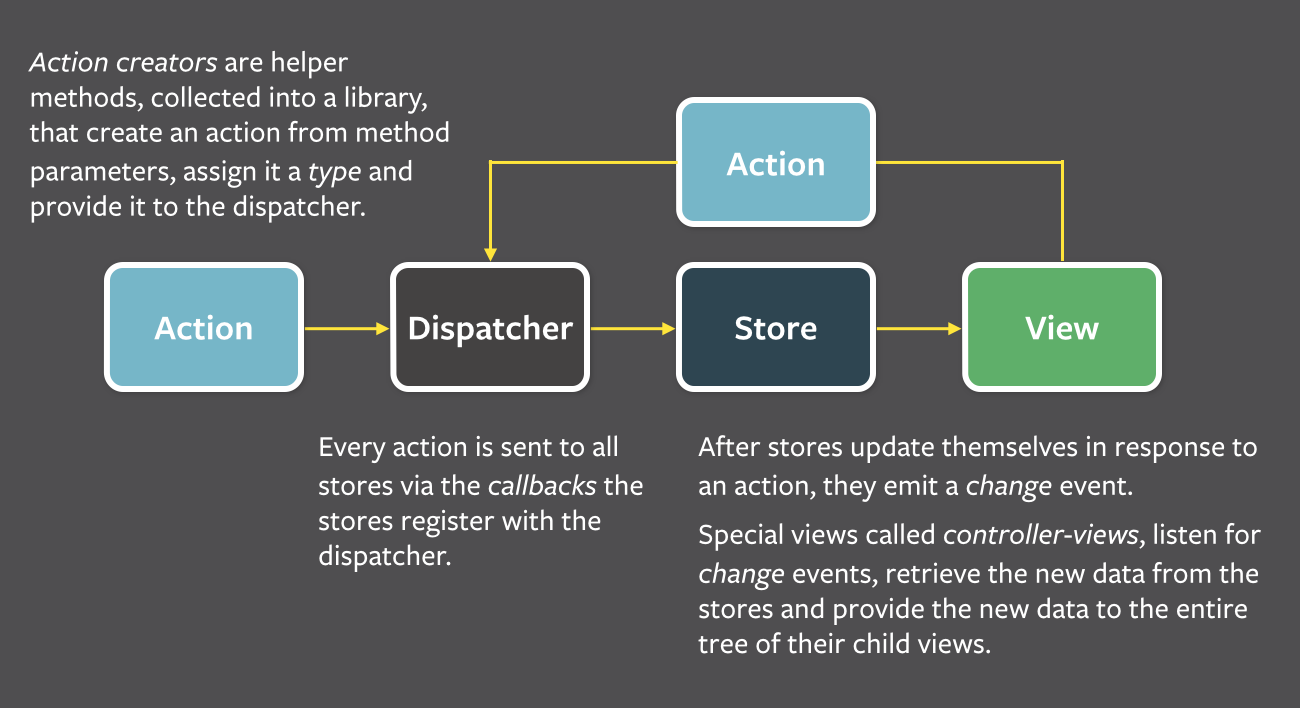
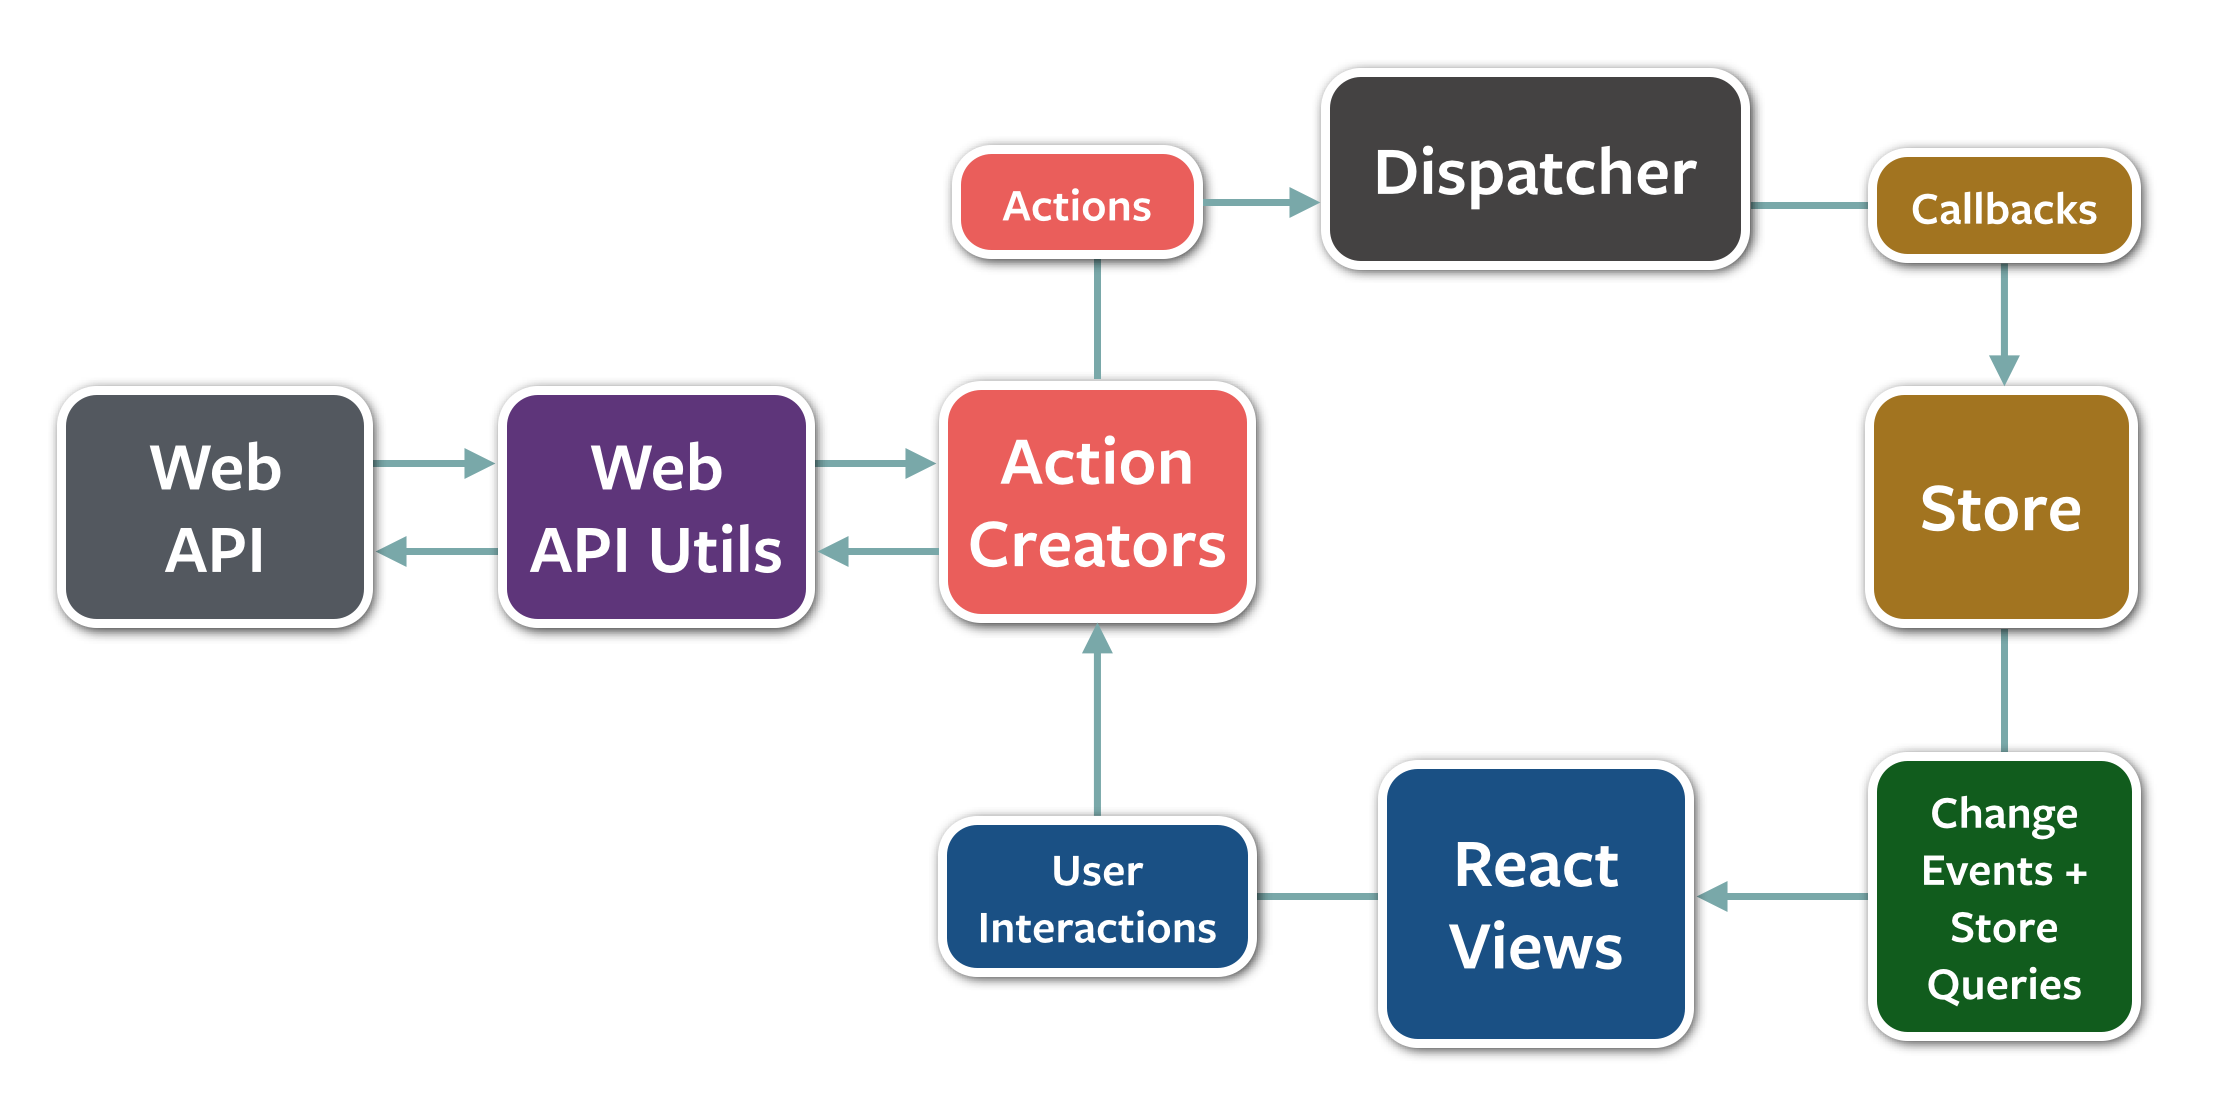
Action
Action 是用户与 View 层交互后发出的消息,如点击事件等。多个 Action 可以由 actionType 来区分。
Dispatcher
Dispatcher 是整个应用的事件分发中心,管理所有的数据流。接收 Action 传来的数据后,执行 Store 注册的回调函数,将 Action 提供的数据发送给 Store。
对单个应用 Dispatcher 是单例的。可以在执行回调函数前执行 debug 操作、日志操作、权限操作等。
Store
Store 封装了所有的业务逻辑和数据处理。所有的数据变化都发生在 Store 内部。Store 对外只提供了 get 接口,不允许提供 set 接口。View 不允许直接操作 Store。所有的数据都是由 Dispatcher 收到 View 触发的 Action 后,发送到 Store,再触发 change 事件传回到 View。
View & ControllerView
ControllerView 可以理解为容器组件,类似 MVC 中的 controller,包含了一个或多个 View 子组件。
数据由 Store 传递到 ControllerView 后,通过 setState 修改 ControllerView 的状态,再通过属性传递到各个 View 子组件。View 不允许有自己的状态,所有的数据只能通过属性从 ControllerView 获取,所有的表现都由 ControllerView 决定。
因此 View 做的非常薄,只关心交互及触发不同的 Action。
Flux 如何工作
View –> Action
1 2 3 4 5 6 7 8 9 10 11 12 13 14 15 16 17 18 19
| // MyListView.js export default class MyListView extends Component { // ... render() { return ( <ScrollView style={styles.container}> <View> <Text style={styles.add} onPress={this.props.addItemClickFunc}>Click me to Add!</Text> { this.props.items.map((item, index) => <Text key={index} style={styles.item}>{index}: {item}</Text> ) } </View> </ScrollView> ); } }
|
this.props.addItemClickFunc 由 ControllerView 通过属性传递给 View。点击 View 中的 Click me to Add! 就会触发 Action。
1 2 3 4
| // MyListViewController.js _onAddItemClick() { ButtonActions.addItem('item') }
|
Action –> Dispatcher
1 2 3 4 5 6 7 8 9
| // ButtonActions.js const ButtonActions = { addItem(item) { AppDispatcher.dispatch({ actionType: ADD_ITEM, actionItem: item }) } }
|
触发 Action 后,由事件分发中心 Dispatcher 来统一处理。
Dispatcher –> Store
1 2 3 4 5 6 7 8 9 10
| // AppDispatcher.js AppDispatcher.register((action) => { switch(action.actionType) { case ADD_ITEM: ListStore.addItem(action.actionItem) ListStore.emitChange() break default: } })
|
Dispatcher 根据 actionType 来执行不同的 Store 回调,将 Action 提供的数据发送给 Store。
Store –> ControllerView –> View
1 2 3 4 5 6 7 8 9 10 11 12 13 14 15 16 17 18 19 20 21 22 23 24 25 26
| // ListStore.js const ListStore = assign({}, EventEmitter.prototype, { items: [], getAll() { return this.items }, addItem(item) { this.items.push(item) }, emitChange() { this.emit('change') }, addChangeListener(callback) { this.on('change', callback) }, removeChangeListener(callback) { this.removeListener('change', callback) } } )
|
1 2 3 4 5 6 7 8 9 10 11 12 13 14 15 16 17 18 19 20 21 22 23 24 25 26 27 28 29 30 31 32 33 34 35 36
| // MyListViewController.js export default class MyListViewController extends Component { constructor(props) { super(props) this.state = { items: ListStore.getAll() } } componentDidMount() { ListStore.addChangeListener(this._onListChange.bind(this)) } componentWillUnmount() { ListStore.removeChangeListener(this._onListChange.bind(this)) } _onListChange() { this.setState({ items: ListStore.getAll() }) } _onAddItemClick() { ButtonActions.addItem('item') } render() { return ( <MyListView items={this.state.items} addItemClickFunc={this._onAddItemClick}/> ) } }
|
Store 数据发生变化后执行 emitChange,告诉 ControllerView 通过 setState 改变状态,再执行 render 通过属性下发数据改变 View。
详细例子可以参考 https://github.com/danke77/mastering-flux
本文是 慌不要慌 原创,发表于 https://danke77.github.io/,请阅读原文支持原创 https://danke77.github.io/2016/10/25/understanding-flux/,版权归作者所有,转载请注明出处。
如果觉得我的文章对您有用,请随意打赏。您的支持将鼓励我继续创作!
